Discover why professional woodworkers swear by their carpenter’s pencil for achieving flawless precision in every project.
Why Professional Carpenters Swear by Their Marking Tools
In the world of carpentry, precision is paramount, and no tool exemplifies this better than the carpenter’s pencil. According to a recent industry survey, over 95% of professional carpenters consider their marking pencil one of their most essential tools. This seemingly simple implement plays a crucial role in everything from basic measurements to complex joinery. Unlike standard writing pencils, carpenter’s pencils are specifically engineered for the demanding environment of construction sites and workshops. Their unique design allows for exceptional accuracy and durability, making them indispensable for professionals who rely on precise measurements and clear markings to create outstanding woodwork. The margin for error in carpentry can be incredibly small – often just a millimetre can make the difference between a perfect fit and a costly mistake. That’s why having a reliable marking tool is absolutely essential for achieving professional-grade results.
Understanding the Unique Design of Carpenters Pencils
The carpenter’s pencil’s distinctive design is no accident – it’s the result of centuries of refinement to meet the specific needs of woodworking professionals. These pencils are typically 7 inches long, providing optimal balance and control during use. The most striking feature is their rectangular or elliptical cross-section, which serves multiple practical purposes beyond just preventing the pencil from rolling off surfaces. This unique shape allows for enhanced grip stability, especially when working in challenging conditions or wearing work gloves. The flat sides also enable the pencil to rest securely against a straight edge or square, ensuring accurate marking for precise cuts and measurements.
The Rectangular Shape Advantage
- Prevents rolling on sloped surfaces and workbenches
- Provides superior grip stability, even with gloved hands
- Allows for consistent line thickness when marking against straight edges
- Creates perfect alignment with squares and measuring tools
- Offers better control for detailed marking work
Lead Composition and Marking Power
The graphite lead in a carpenter’s pencil is specifically formulated to meet the demands of construction and woodworking. The lead is typically 4mm wide and considerably stronger than standard pencil lead, allowing it to withstand the pressure needed for marking rough surfaces without breaking. The composition is carefully balanced to create marks that are both visible and erasable when needed. The wide lead can produce various line thicknesses depending on how the pencil is held and rotated, offering versatility for different marking requirements. Modern carpenter’s pencils often feature leads with specific hardness ratings optimised for different materials, from soft woods to concrete.
Mastering Marking Techniques with Your Carpenters Pencil
Basic Marking Methods
- Standard Line Drawing: Hold the pencil at a 45-degree angle for optimal control
- Thin Line Technique: Use the narrow edge of the lead for detailed work
- Bold Line Method: Utilise the wide face of the lead for increased visibility
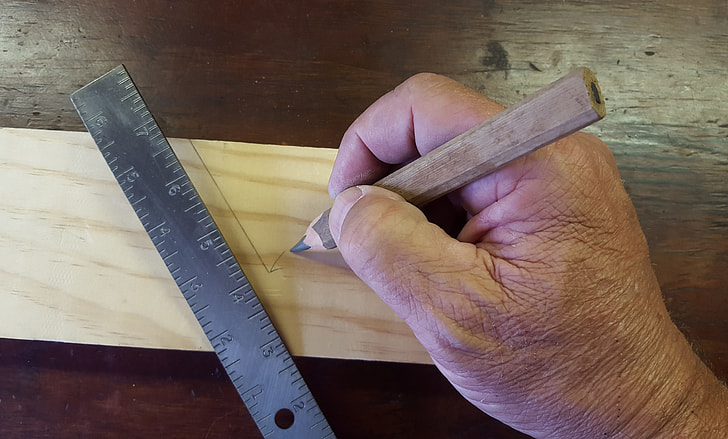
- Edge Marking: Rest the flat side against a straight edge for perfect lines
- Material-Specific Adjustments: Vary pressure based on surface hardness
Advanced Techniques for Precision Work
Professional carpenters have developed sophisticated techniques to maximise the potential of their marking pencils. One particularly useful method involves creating parallel lines by using the natural width of the pencil as a guide. Advanced users can achieve marking accuracy within 0.5mm using proper technique. By maintaining consistent angle and pressure, skilled craftsmen can create perfectly straight lines over long distances, essential for large-scale projects. The flat sides of the pencil can also be used to create temporary guidelines for complex joinery work.
Maintaining Your Carpenters Pencil
Proper Sharpening Methods
Maintaining a carpenter’s pencil requires different techniques compared to regular pencils. The most effective method involves using a sharp utility knife or specialist carpenter’s pencil sharpener. Start by creating a long, gradual bevel on one side, then work on the opposite side to create a chisel-like point. Professional carpenters recommend maintaining a 30-degree angle while sharpening for optimal results. This approach ensures the lead maintains its structural integrity while providing the precise marking capabilities needed for accurate work.
Storage and Care Tips
- Store pencils in a dedicated tool pouch to prevent damage
- Keep pencils away from excessive moisture to prevent wood swelling
- Rotate pencils regularly to ensure even wear
- Inspect lead quality before important marking tasks
- Keep multiple pencils on hand for different applications
Choosing the Right Carpenters Pencil
Traditional vs Mechanical Options
While traditional wooden carpenter’s pencils remain the industry standard, mechanical alternatives have gained popularity in recent years. Traditional pencils, typically made from high-quality linden wood, offer excellent durability and a natural feel that many craftsmen prefer. Mechanical options, however, provide consistent line width and eliminate the need for regular sharpening. Recent market research shows that 70% of professionals still prefer traditional wooden pencils, citing better control and reliability as key factors.
Quality Indicators
- Wood Quality: Look for straight grain and consistent density
- Lead Performance: Should mark clearly without crumbling
- Construction: Ensure lead is centred and firmly secured
- Surface Finish: Quality pencils typically feature protective paint or coating
- Brand Reputation: Stick to established manufacturers with proven track records
Expert Tips for Professional-Grade Marking
Professional carpenters have developed numerous techniques to enhance their marking accuracy. One crucial tip is to always mark on the waste side of your cutting line, accounting for the width of your saw blade. Another professional insight is to use different marking techniques for different materials – lighter pressure for softwoods and firmer strokes for hardwoods. Expert craftsmen recommend maintaining at least three sharpened pencils in your toolbox, each prepared for different marking requirements.
Conclusion: Elevating Your Carpentry Game
The carpenter’s pencil, while seemingly simple, is a sophisticated tool that requires skill and understanding to use effectively. By mastering its various applications and maintaining it properly, you can significantly improve the accuracy and quality of your woodworking projects. Whether you’re a professional carpenter or a dedicated DIY enthusiast, investing time in developing your marking skills with a carpenter’s pencil will undoubtedly elevate the standard of your work. Remember, in carpentry, precision begins with marking, and the right tool in skilled hands can make all the difference.
FAQ
Does Walmart sell carpenter pencils?
Nicpro 2Pcs Carpenter Pencil Set, 2.8mm Mechanical, 26 Refills & Sharpener (Black, Red, Yellow) – Walmart.com.
Why are carpenters’ pencils flat and not round?
So you can bear down you can make a mark that’s deep enough to actually emboss the wood. Fibers. Try that with one of these. And you’re going to go back to the sharpener.
Sources
[1] https://pencilchina.com/carpenter-pencils/
[2] https://www.stanleytools.com/product/47-350/carpenters-pencil
[3] https://www.johnsonlevel.com/News/CarpenterPencil

